

Your company needs signage and/or branded promo items and you’ve been charged with the design and preparation of art files for production. So…what do you need to know before getting started?
Creating Infographics is Easy When You Know How!
Download Your Guide Here!
Print Specs
For any common printed material that is square or rectangular—like printed signage, business cards, brochures, etc.— the three main things you’ll need to know before beginning the design work are: total printed size of the final piece (often called trim size or referred to as the die-line in some print templates), bleed specs (or bleed line) and imprint area (or safe zone).
Total Print Size (trim size): This is the final size of the item once it’s been printed and trimmed. For example, the total final print size of the common business card is 3.5” wide by 2” tall. Some business cards are different sizes, square business cards have become fashionable of late. When designing a card or printed signage of any type, it’s important to first know what the final trim size is once printed.
Bleed Specifications: If you want to print an image or color all the way to the edge of the final printed piece, you first need to know what the printer’s bleed specs are—these specs may vary from print vendor to print vendor so it’s important to ask. What are bleeds you may ask? You may have noticed that I keep using the term “total” or “final” printed size. This is because with many commercial printing processes, the substrate (often paper) is larger than the final printed size of the item and is trimmed down (often die-cut) to a final size after being printed. But why? Let’s use business cards as an example again. The final trimmed size is 3.5” by 2”, but business cards are printed (many at a time) on a much larger sheet of card stock then trimmed out of the card stock to their final size. Which leads me to bleeds. If your design includes images, elements and/or colors that are printed all the way to one or more edges of the business card, the designer needs to extend (or bleed) the image or color beyond the final trimmed size of the business card (usual by about 1/8”) in order to account for any shifting of the cardstock that may occur during the printing process. This makes the total size of the business card, as far as a designer is concerned, is 3.625” x 2.125”. For example, if you bleed your image or color 1/8” of an inch beyond the business card trim size and the substrate shifts 1/16” during printing, the image or color will still be printed to the edge of the final product. Without bleeds, if the substrate shifts during printing, there will be a sliver of unprinted paper or card stock 1/16” to 1/8” wide where there should be something printed.
Imprint Area (Safe Zone): This operates under the same logic as the bleed specs, described above, but deals with any important information that exists within a design. Whereas a bleed line of a business card usually exists about 1/8” beyond the final trim size, the safe zone is an area with the business card that has an 1/8” margin between it and the trim line. In this way, if the substrate shifts during printing, important information such as the name and contact info on the business card is safe from being trimmed off of the card. (see fig.1)
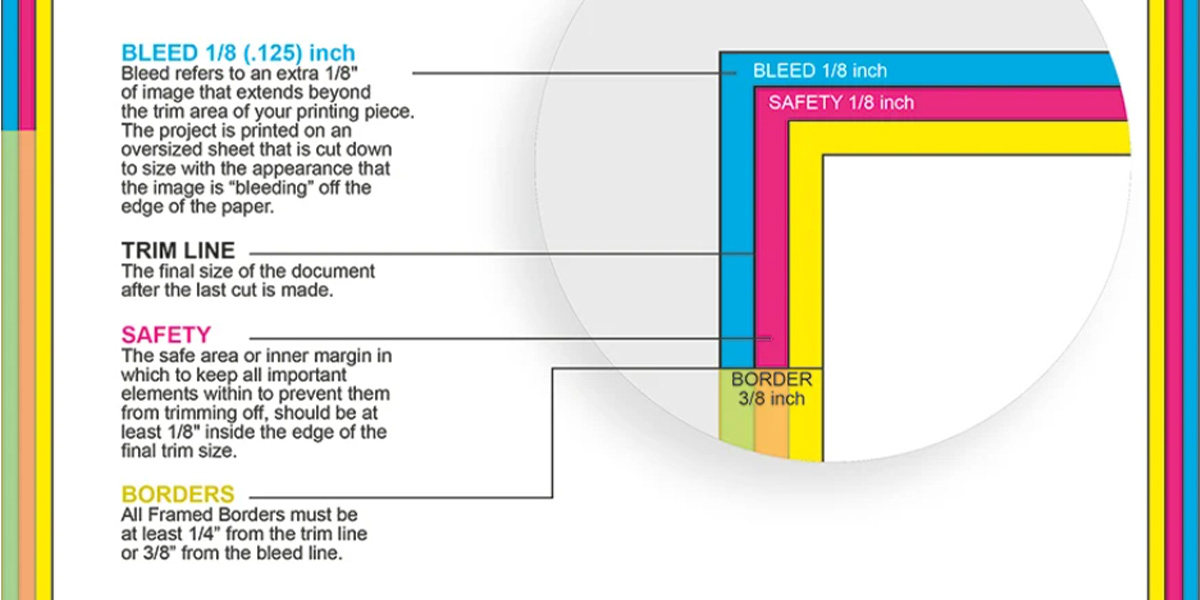
(Fig.1) Remember—the examples described above concern business cards. Be sure to get the specific total print size, bleed specs and safe zone specs for your project from your print vendor as these specs vary.
Templates, Templates, Templates!
In the first section, we covered the common print specs for common printed items like cards, brochures and signage—essentially, two dimensional items. But what if your company needs you to design branded promotional items such as pens, travel tumblers and tee shirts? What if they want something even more unique like custom popcorn boxes, branded golf balls or even branded remote-controlled drones? For simple items like pens or mugs, you may be able to get by with just knowing the size of the imprint area but, for more complex items—especially for those with folds (see fig. 2)—you need a template! A good template provides a designer with all of the information they need to design a more complex promotional item with confidence.
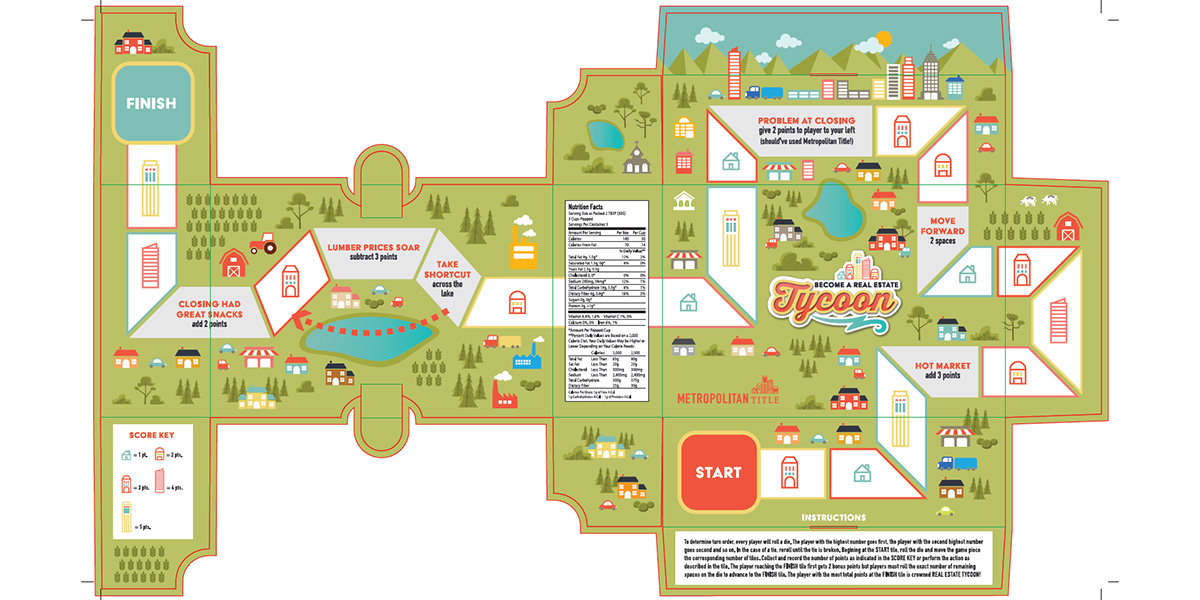
(Fig.2) Without this template, complete with fold lines, panels, die lines, bleed lines and trim marks, this popcorn box for Metropolitan Title would never get printed.
Besides basic bleed, trim and safe zone requirements, many templates will also include the following information:
- Color information. Is this project being printed digitally as a CMYK print job or do spot colors such as pantones need to be used?
- If using spot colors, what are the maximum number of colors that can used in the design?
- Minimum resolution requirements and the manner in which raster images such as photographs should be submitted to the printer (embedded or linked).
- Minimum font point sizes. How small can the wording get before the counter shapes within the font start to fill in with ink and become unreadable?
- What file type does the vendor require? For many vector jobs, printers prefer EPS files but will use PDF files if that’s all that is available. Which brings me to a word of warning: many of the contacts you may have at a print vendor don’t have a good grasp of file type. For instance, many a vendor has told me that they can print photographs yet insist that they need a vector file. Obviously, these two concepts are mutually exclusive. Don’t be afraid to ask to be put in contact with a print tech in order to sort these sorts of issues out.
The world of getting things printed may seem complex, indeed there are various print methods in use today. But, with a basic understanding of the principles of printing—namely the concept of bleeds and knowing the difference between vector and raster graphics—as well as getting a little bit of experience under your belt, there’s virtually no limit to the types of designs that can be brought to life.


